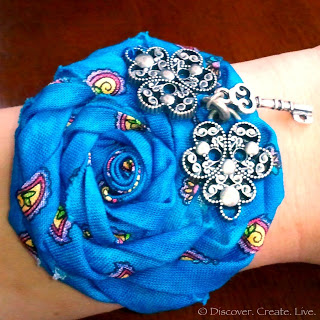
Whilst searching for gift ideas, I came across a gorgeous Rosette Bracelet Tutorial by Heidi at sew.craft.create. I instantly fell in love! I had already used the “rosette” flower technique a couple of times before on some other projects so I thought this would be super easy. When it came time to create my version, I didn’t actually look back at the post since I knew what I wanted to do after
reading it the first time, but definitely check out the link for a great step-by-step pictorial guide on how she created hers…
 |
| Credit: sew.craft.create. – Isn’t it beautiful?? |
After looking back on Heidi’s tutorial, it looks like she surged the edges of her fabric, tied a knot for the center, and sewed the strip to the middle as she wrapped the fabric around the center {you’ll want to look at it for yourself}. However, like I said I kind of just went from memory & the method I already knew for this type of flower so mine turned out a bit differently.
For my flower I already had a piece of scrap fabric that had both sides folded into the center and pressed. I then folded it in half again, and started tightly rolling one end for my center. After several rolls, I started to twist my strip as i wound it around the center. I placed several pins as I went and then secured the rows by stitching them together on the back side of the flower after it got to the size I wanted.
After the flower was securely sewn, I laid out the link bracelet and secured each side of each link with thread, looping it as I went. I placed it slightly off center because I thought it would lay better on the arm after I added the charms
 |
| I failed to get a good picture of the bracelet, but it’s Jewelry Maker brand from JoAnn & has a circle & bar closure. |
To finish the bracelet I added a hook closure button set with an added key charm in the middle {from the same set I used for Lexi’s Camera Strap Cover.} Again I used a thread and needle to secure the charms exactly where I wanted them.
And then of course I had to model it {hope you don’t mind Jac :)}.


